
The artworks of my kids are just piled up in the cabinet, gathering dust and looking like clutter. Some are stacked in a big plastic box. My kids are prolific crafters and painters and it is a challenge how to keep their artworks organized. Now, I decided it is time to put all those canvas on the wall.

This quarantine is a chance to organise, declutter and decorate the house. Hanging the kids’ paintings will relive those good memories and surround the house with positive and creative energy.
The first thing to do is measure your wall. This is especially important if you want to hang many paintings. You need to measure the wall so that you will know how many paintings you can fit in. You may use a pulgadera, tape measure, ruler or your arms.
Take note that usually, you hang artworks at eye level which is 57-60 inches from the floor. But I also considered the eye level of a 6 year old kid which may be 37-45 inches from the floor.
Second, arrange the paintings on a flat surface, especially if you have many paintings to hang on one wall. Arrange them as it would look like when hung on the wall. It would be difficult to just eyeball them in the wall. Also, in this way, you can already see if the pieces go together and fit your wall.


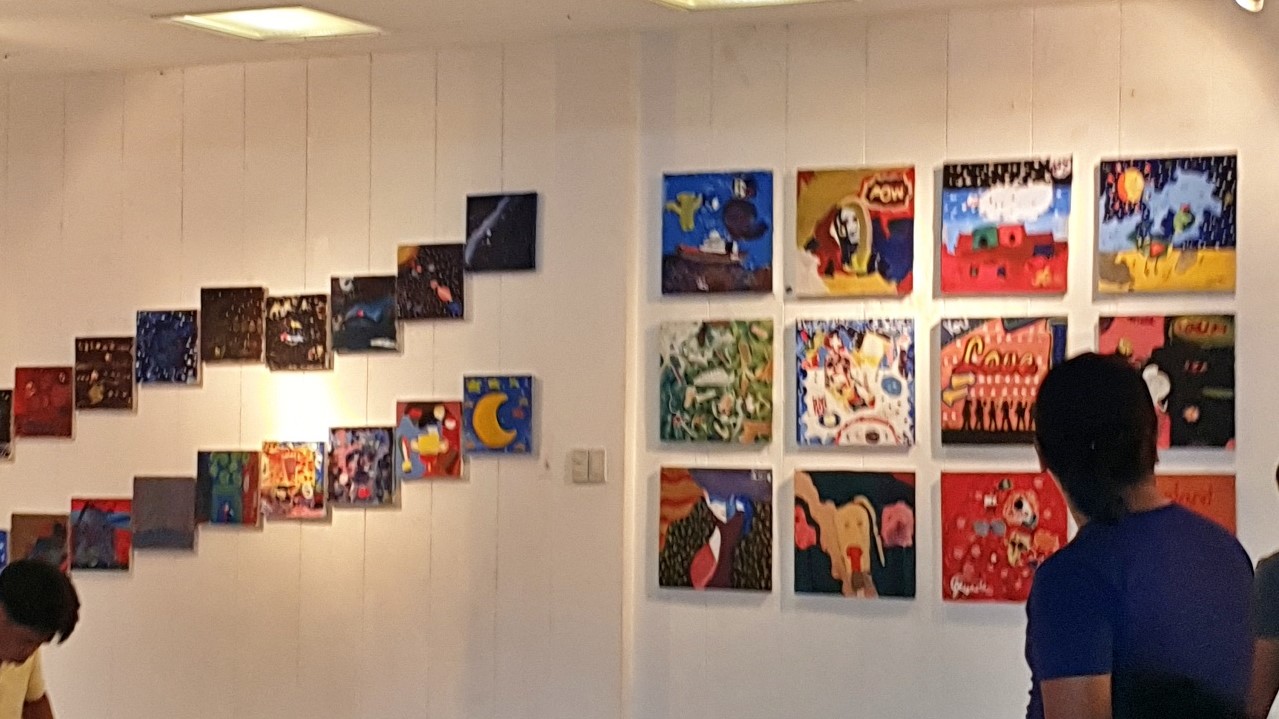
You may classify them by size, by medium, by theme, or by artist. I initially intended to put on one wall all the paintings done by my eldest daughter. But some of her canvas are way too big and the finish look would look cluttered. So to achieve a neat look, I decided to put the small ones in this wall.

Third, trace the perimeter of each canvas on a big paper like an old big calendar, newspaper or pieces of scratch papers taped together. To do this, simply put the canvas on top of the big paper and outline its perimeter using a pencil. Then cut the paper accordingly. Stick the cut papers on the wall where you envision each painting will be hung.
I like doing this step because it visually tells me exactly where the paintings would go. I can then eyeball its overall look in the wall. Then I can adjust the distance between paintings by just moving the papers. And by using paper, locating where to put the wall anchor on the wall will be easier.
Fourth, put the wall anchor on the wall. For heavy paintings, or paintings which are framed with glass, you may need to drill a screw or nail. I used to drill a screw and my husband would comment, “Oh, no, kawawa naman ang wall natin.” Until I discovered these hardwall hooks which have tiny nails that can be easily hammered on the wall and won’t damage the wall as much. But for small canvas, you may use plastic hooks. Different hook sizes have corresponding weights that they are fit to hold up.
When putting the wall anchor, this is where you need to measure. You need to measure a little exactly where the wall anchor and the sawtooth at the back of the canvas will meet so that when you hang the painting, it will correspond a little exactly to its location as planned. Yes, no need to be very exact. Our eyes and brains will not notice a few millimetres off.
Measure the distance from the top of the frame to the bottom of the sawtooth. Imagine where they meet with the wall hook and that is where you should measure. You may use a ruler. But with no ruler and just the pencil that you are holding, you can measure correctly.
Flip the canvas and at the back you will see a sawtooth. The art canvas that you buy in art stores does not have a sawtooth at the back. I already hammered the sawtooth at the back of the canvas days before. For this small canvas, I just used my pencil and marked with my thumb the required distance. Then with my thumb still holding the pencil in the marked distance, I carried the pencil to the paper on the wall to mark the same distance.


Instead of grabbing another measuring tool to locate the center of the canvas, I just folded the paper in the middle. The intersection of the center of the paper and the height of the sawtooth is where I made my final mark. It is an easy job.
Once marked, it is time to stick the hooks on the wall. For adhesive plastic hooks, the wall should be wiped clean with water and dried before fixing the adhesive. After sticking the hooks, I wait for a day before hanging the paintings.
Fifth, hang those paintings! I usually wait for a day before hanging the paintings when I use adhesive wall hooks. These small plastic hooks carry well the small canvas and is also kinder to the wall.

Viola! I have achieved the look that I wanted. The paintings look pulled together. The upper row has its lower bottom horizontally aligned. The second row also has the two similar sized frames aligned. The third row has their tops aligned. When also assessing vertically, all the canvas are also aligned. If some of the edges tilt, you may use a masking tape to tape the canvas on the wall so it would not tilt. The masking tape won’t peel off your wall paint or leave a residue on the wall when you remove it, unlike if you use a scotch tape or double sided tape.


Yes, it is not too much effort to hang artworks on the wall like a pro. This technique works well with picture frames, too. By following the steps above, you can do it right and avoid multiple holes in your wall “para di naman kawawa ang walls nyo.” 🙂
